Once the required fields have been added into the navigation section they can each be amended as needed.

Click on the Edit button against a field to undertake the following changes:
All Fields:
- Description: Change the default field Description (name).
- Mark the field as Mandatory: Tick this box if the field must be completed before the item can be submitted for approval.
- Mark the field as Read Only: Tick this if you wish to make the field read only for that stage or governance report. Note: this action will lock the field down to all users including System Administrators and TMI staff.
- Add in field level Help Text: Help text can be entered directly here for the field. This will need to be repeated for each stage or governance report that you wish this help to appear on (this will be automatically included in any stage/governance report copies). Alternatively, generic help can also be switched on from here. See Step 3.2: How to add help for more information.
- Apply the ‘Show in Summary’ flag: Tick this box on any field within a one-to-many control to include the selected field in the summary table display on that control. This box can also be ticked on certain project level or governance report fields to be included in the summary table view. See What are tables? for more information.
Free Text Fields:
- Text Input Control Type: This option defaults to Editor, meaning the field behaves as a standard rich text field with formatting options such as Bold, Underline, and more. If required, the field type can be changed to Single-line or Multi-line. Selecting on of these options will present the field to the user as either a simple single-line text box or a fixed-size multi-line text box. All rich text editor formatting features are removed. When using the single-line or multi-line options, we recommend applying a character limit to ensure the content displays consistently and as intended on screen.
- Character Limits: A positive value will restrict the text input to this limit. A negative value will only act as a warning to the user. Note: The character limit warning option only applies when using the editor control type as this has the ‘pop-out’ text box on the frontend.

Yes/No Lookups:
- Additional Yes/No Options: Add additional options to a Yes/No lookup field such as N/A, Unsure, and more. See Step 4.1: How to populate a lookup table (dropdown) for more information.
Numerical Fields:
- Number Format: Use this to specify the number format for a numerical field i.e. £1,000.00.
One-to-Many Tables:
- Show Total Row (where applicable): Use this to apply a total line on the summary view of any relevant one-to-many tables.

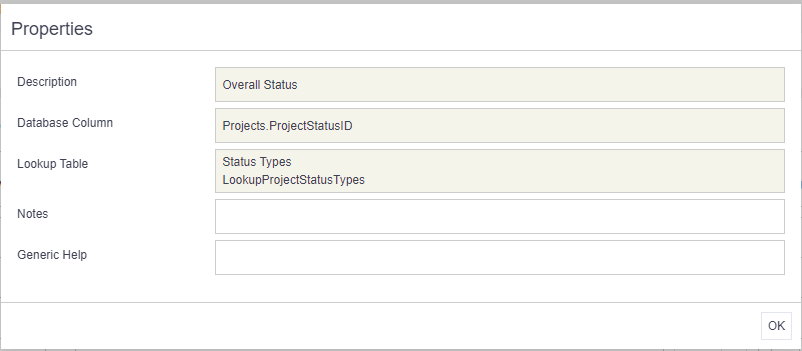
Properties
Access the properties information in this view via the downward triangle > properties menu when editing a field. This is particularly useful when trying to identify the lookup table name.
Advice
- Make sure you order your fields in a logical way so that the summary views are clear and user friendly.
- Any fields with help text will be identified by an '?' icon. The user can click on this to view the help text.